This is an old revision of the document!
Tutorial 7 - Creating a Transport model
3/5
You will now try to replicate the results from the Compartment model with a Transport block. As the equations and parameters are the same, you can re-use the previous model.
Creating the model structure
Save the previous project with a new name.
Create a Transport block by right-clicking in the Blocks window and choosing Create | Transport.
Edit the block and rename it “Transport”.
Expand the Transport block.
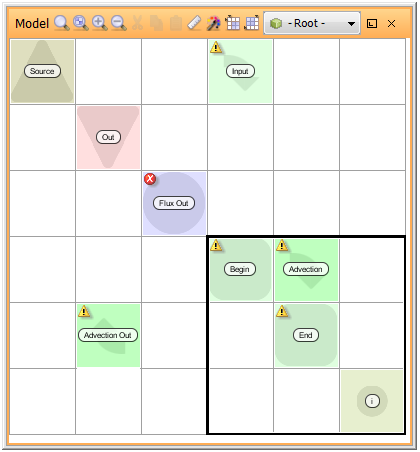
Move the Transfer block Input, so that it connects Source with Begin. You can do this either by dragging the block directly in the matrix to its new position, or by editing the block and changing the target property from Layer_1 to Begin.
Move the Transfer block Advection_1_2 so that it connects Begin with End. Edit the block and rename it to “Advection”.
Move the Transfer block Advection_3_Out so that it connects End with Out. Edit the block and rename it to “Advection_Out”.
You can now delete the Compartment blocks Layer_1, Layer_2 and Layer_3.
Move the blocks Flux_Out, R, dx, length and v to the Transport sub-system.
The number of discretizations is now determined by the built-in block Transport.N. Delete the old expression N, but be careful so that you do not delete Transport.N.
Assigning values
- Edit the Expression block Flux_Out. Change the expression to “Transport.End * Advection_Out”.
- Edit Transport.N. Change the value to “3”.
- Run a simulation. Do you get the same results as with the classic compartment model?
- Try to run simulations and vary the value of N. What happens? Why?
- Save the project.
Solution to this part
Next
Previous
References


