Table of Contents
Tutorial 11-Using the module library
Overview and Objective
This tutorial uses a simplified version of the core sub-systems used for the SR97 post closure safety assessment. You will install a library containing three sub-systems; the near field, the geosphere and the biosphere. By combining these three sub-systems you will simulate the transport of radionuclides of the U-238 decay chain from the source (a broken canister) to water bodies on the surface.
After this tutorial, you will have learned to construct a model by combining sub-systems from an Ecolego library.
Installing the library
- Download and unzip archive with library file sr97.zip
- From the File menu, choose Library > Manage library…
- Click the Import… button and choose the file “SR97.ecl”. When you close the file window, a folder named SR97 should appear in the list below.
- Open the folder by pressing the + symbol and assert that it contains the three sub-systems “Biosphere”, “Geosphere” and “Nearfield”.
- Close the window
Adding the Nearfield sub-system
- Download and unzip archive with file “SR-97 empty.eco” sr_97_empty.zip. This project contains only some simulation settings.
- Click File > Open project and select the file “SR-97 empty.eco”.
- In the Graph window , right-click and select Get from library…
- From the window that appears, select Nearfield and click Ok.
- A sub-system should now be placed on the graph. You can open the sub-system by clicking the + symbol
- Switch to the simulation layout by clicking the Simulation button in the toolbar.
- Click the Run toolbar button or select Simulation > Run from the menu.
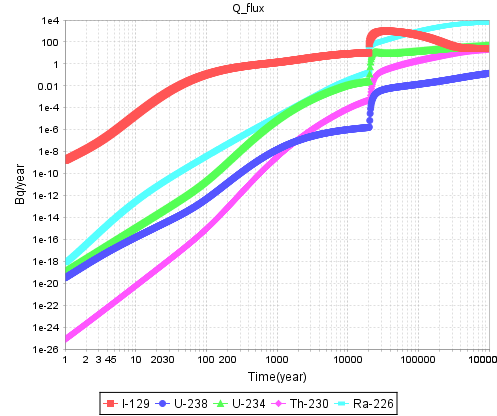
- When the simulation has finished, the Results window displays a folder with the date and time of the simulation. Open this folder by clicking the small + sign. Next, open the sub-folder named Nearfield. It contains the further nested folders with outputs for the different discretizations of the barriers around the capsule. In the bottom, there is an output named Q_flux. This output contains the flow of radionuclides from the nearfield to the bedrock.
- Select the Q_flux output. From the list below, click (All) to include all the radionuclides (by default, only the first radionuclide, I-129, is selected).
- A plot over time should appear in the Charts window. Make sure that the scale is log by clicking the Log x and Log y buttons beneath the chart. You can also add a legend by selecting a legend position from the Legend drop down list.
Adding geosphere
You will now add a sub-system representing the geosphere and make sure that it is properly connected to Nearfield.
- Return to the modelling window layout by clicking the Modelling button in the toolbar.
- If you have opened the Nearfield sub-system, close it.
- Right-click an empty area of the graph and select Get from library…
- Select Geosphere from the list and close the window by clicking Ok.
- Ecolego will now ask if you want to automatically connect Geosphere to other sub-systems in the model. Click Ok.
- The Geosphere sub-system should now appear, with a connector from Nearfield to Geosphere.
- Select the connector, and inspect it in the Information window. The connector makes sure that some parameter values, as well as the output flux (Q_flux) from the Nearfield are transferred to the Geosphere.
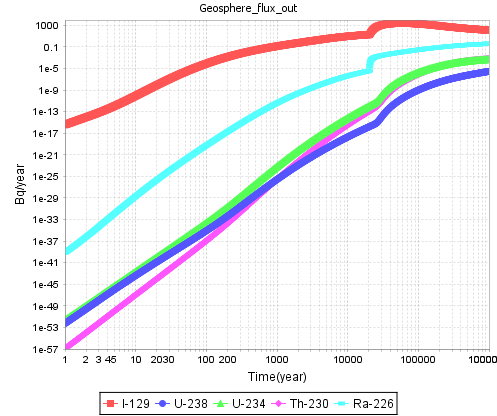
- Run a simulation and create a plot of the output Geosphere > Geosphere flux out. This output represents the release of contaminants to the surface.
Adding biosphere
You will finalize the tutorial by adding a sub-system for the sea which is located on the surface. Instead of letting Ecolego automatically connecting it to Geosphere, you will do it yourself.
- In the graph, add the Biosphere sub-system. When asked if you want to automatically connect it to other sub-systems, click Cancel.
- When the Biosphere sub-system appears on your screen, move the mouse cursor to the center of the Geosphere sub-system. A green outline should be displayed. While keeping the left mouse button pressed, move the mouse cursor to the center of the Biosphere sub-system. When you release the mouse button a connector should appear from Geosphere to Biosphere.
- Right-click the connector and select Edit.
- The only output of the Geosphere (Geosphere flux out) should be connected to the only input of the Biosphere (also named Geosphere flux out).
- Close the window without making any changes.
- Run a simulation.
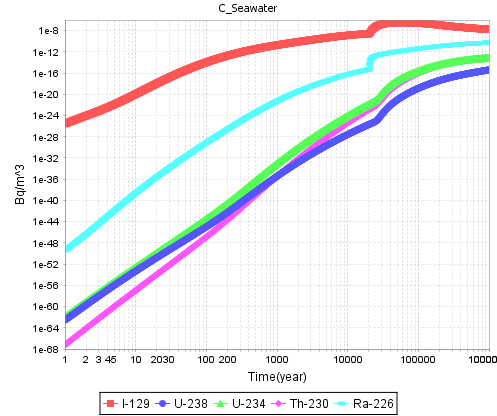
- Create a plot of Biosphere > C_Seawater, which represents the activity concentration in sea water.
References


